The version described here is no longer supported.
This guide will detail how to install the 2015.005 “Arbitrary” release version of the tools required to run simulations on SpiNNaker using the PyNN scripting language.
This has been tested using Fedora Linux 20 64-bit, Ubuntu Linux 14.04 LTS 64-bit, Windows 8.1 64-bit, and Mac OS X Mavericks, but it should in principle work on 32-bit and 64-bit versions of Fedora and Ubuntu Linux, Windows 7 and 8, and Mac OS X.
Contents
- Ubuntu Linux Requirements
- Fedora Linux Requirements
- Mac OS X Requirements
- 32-bit Windows Requirements
- 64-bit Windows Requirements
- Windows PATH settings
- Standard Central Installation
- User-Only Installation
- Virtualenv Installation
- Configuration
- Running some examples
- Troubleshooting
Ubuntu Linux Requirements
- Install Python
sudo apt-get install python2.7 - Install numpy
sudo apt-get install python-numpy - Install scipy
sudo apt-get install python-scipy - Install lxml
sudo apt-get install python-lxml - Install pip
sudo apt-get install python-pip - Optional: Install matplotlib (often used in PyNN scripts for plotting graphs)
sudo apt-get install python-matplotlib
Continue to the Standard Central Installation, User-only Installation or Virtualenv Installation to install the remaining requirements.
Fedora Linux Requirements
- Install Python
sudo dnf install python - Install numpy
sudo dnf install numpy - Install scipy
sudo dnf install scipy - Install lxml
sudo dnf install python-lxml - Install pip
sudo dnf install python-pip - Optional: Install matplotlib (often used in PyNN scripts for plotting graphs)
sudo dnf install python-matplotlib
Continue to the Standard Central Installation, User-only Installation or Virtualenv Installation to install the remaining requirements.
Mac OS X Requirements
- Download and install MacPorts
- Install python
sudo port install python27
sudo port select --set python python27 - Install numpy
sudo port install py27-numpy - Install scipy
sudo port install py27-scipy - Install lxml
sudo port install py27-lxml - Install pip
sudo port install py27-pip
sudo port select --set pip pip27 - Optional: Install matplotlib (often used in PyNN scripts for plotting graphs)
sudo port install py27-matplotlib
Continue to the Standard Central Installation, User-only Installation or Virtualenv Installation to install the remaining requirements.
32-bit Windows Requirements
- Download and install Python
- Download and install numpy
- Download and install scipy
- Download and install lxml
- Download and install setuptools and [pip] (https://github.com/SpiNNakerManchester/github.SpiNNakerManchester.io/releases/download/v1.0-win32/pip-1.5.6.win32-py2.7.exe)
- Optional: Download and install matplotlib (often used in PyNN scripts for plotting graphs)
- Download and install dateutil, pyparsing, six and matplotlib
Continue to edit your PATH, before installing the remaining requirements.
64-bit Windows Requirements
- Download and install Python
- Download and install numpy
- Download and install scipy
- Download and install lxml
- Download and install setuptools and [pip] (https://github.com/SpiNNakerManchester/github.SpiNNakerManchester.io/releases/download/v1.0-win64/pip-1.5.6.win-amd64-py2.7.exe)
- Optional: Download and install matplotlib (often used in PyNN scripts for plotting graphs)
- Download and install dateutil, pyparsing, six and matplotlib
Continue to edit your PATH, before installing the remaining requirements.
Windows Path Settings
- Edit your PATH environment variable to include the Python27, Python27\Scripts and (if installed) gtk\bin directories.
- Go to “Control Panel”
- Go to “System” (may be under “System and Security”)
- Select “Advanced System Settings”
- Select “Environment Variables”
- Select the “Path” in the “System Variables” box at the bottom
- Click on “Edit”
- Add the new directory by putting it before the existing string, followed by a single semi-colon; if you installed the dependencies to the default/recommended locations, prepend Path with:
C:\Python27;C:\Python27\Scripts;
Continue to the Standard Central Installation, User-only Installation or Virtualenv Installation to install the remaining requirements.
Standard Central Installation
These instructions will install the required packages in a central location. If you are installing on Linux, you must have root access to do this (or prepend each command with sudo), and Windows users should run these commands from a command prompt run as Administrator (right-click the shortcut for the command prompt and select “Run as administrator” - without the sudo).
If you already have installed sPyNNaker previously (and the optional sPyNNakerExtraDevicesPlugin and/or sPyNNakerExtraModelsPlugin), you will need to uninstall it:
[sudo] pip uninstall pyNN-SpiNNaker
[sudo] pip uninstall sPyNNaker
[sudo] pip uninstall sPyNNakerExternalDevicesPlugin
[sudo] pip uninstall sPyNNakerExtraModelsPlugin
- Install sPyNNaker
[sudo] pip install sPyNNaker - Install pyNN-SpiNNaker
[sudo] pip install pyNN-SpiNNaker - Optional Install sPyNNakerExternalDevicesPlugin (used for live input and output)
[sudo] pip install sPyNNakerExternalDevicesPlugin - Optional Install sPyNNakerExtraModelsPlugin (provides some non-standard PyNN models)
[sudo] pip install sPyNNakerExtraModelsPlugin
You can now configure your environment.
User-only Installation
These instructions will install the required packages only for the current user (in your home directory). This can avoid issues where you don’t have root access to the machine you are installing on, or on a shared machine where the dependencies might otherwise conflict with those of other users.
If you already have installed sPyNNaker previously (and the optional sPyNNakerExtraDevicesPlugin and/or sPyNNakerExtraModelsPlugin), you will need to uninstall it:
pip uninstall pyNN-SpiNNaker
pip uninstall sPyNNaker
pip uninstall sPyNNakerExternalDevicesPlugin
pip uninstall sPyNNakerExtraModelsPlugin
- Install sPyNNaker
pip install sPyNNaker --user - Install pyNN-SpiNNaker
pip install pyNN-SpiNNaker --user - Optional Install sPyNNakerExternalDevicesPlugin (used for live input and output)
pip install sPyNNakerExternalDevicesPlugin --user - Optional Install sPyNNakerExtraModelsPlugin (provides some non-standard PyNN models)
pip install sPyNNakerExtraModelsPlugin --user
You can now configure your environment.
Virtualenv Installation
These instructions will install the required packages only in a virtualenv. Like the user-only installation, this can help when you don’t have root access or are on a shared machine. Additionally, it will help when you have several packages with conflicting dependencies, or those that occupy the same namespace (such as pyNN.spiNNaker if you have an older version of the toolchain).
If you already have installed sPyNNaker previously (and the optional sPyNNakerExtraDevicesPlugin and/or sPyNNakerExtraModelsPlugin), you will need to uninstall it:
- Activate your virtualenv,
<name>
source <name>/bin/activate - Uninstall the existing tools
pip uninstall pyNN-SpiNNaker
pip uninstall sPyNNaker
pip uninstall sPyNNakerExternalDevicesPlugin
pip uninstall sPyNNakerExtraModelsPlugin
The installation of virtualenv and the linking to the external libraries is platform dependent.
- Ubuntu Virtualenv Installation
- 32-bit Fedora Virtualenv Installation
- 64-bit Fedora Virtualenv Installation
- Mac OS X Virtualenv Installation
- Windows Virtualenv Installation
Ubuntu Virtualenv Installation
- Install virtualenv
sudo pip install virtualenv - Create a virtualenv;
<name>in the following can be replaced by the name of your choice
virtualenv <name> - Activate the virtualenv
source <name>/bin/activate - Link numpy to the virtualenv
ln -s /usr/lib/python2.7/dist-packages/numpy* $VIRTUAL_ENV/lib/python2.7/site-packages/ - Link scipy to the virtualenv
ln -s /usr/lib/python2.7/dist-packages/scipy* $VIRTUAL_ENV/lib/python2.7/site-packages/ - Link lxml to the virtualenv
ln -s /usr/lib/python2.7/dist-packages/lxml* $VIRTUAL_ENV/lib/python2.7/site-packages/ - Optional: link matplotlib to the virtualenv and install dependencies (only if you chose to install matplotlib)
pip install python-dateutil
pip install pyparsing
pip install six
ln -s /usr/lib/pymodules/python2.7/matplotlib $VIRTUAL_ENV/lib/python2.7/site-packages/
ln -s /usr/lib/pymodules/python2.7/pylab.py $VIRTUAL_ENV/lib/python2.7/site-packages/ - Install sPyNNaker
pip install sPyNNaker - Install pyNN-SpiNNaker
pip install pyNN-SpiNNaker - Optional Install sPyNNakerExternalDevicesPlugin (used for live input and output)
pip install sPyNNakerExternalDevicesPlugin - Optional Install sPyNNakerExtraModelsPlugin (provides some non-standard PyNN models)
pip install sPyNNakerExtraModelsPlugin
You can now configure your environment.
32-bit Fedora Virtualenv Installation
- Install virtualenv
sudo pip install virtualenv - Create a virtualenv;
<name>in the following can be replaced by the name of your choice
virtualenv <name> - Activate the virtualenv
source <name>/bin/activate - Link numpy to the virtualenv
ln -s /usr/lib/python2.7/site-packages/numpy* $VIRTUAL_ENV/lib/python2.7/site-packages/ - Link scipy to the virtualenv
ln -s /usr/lib/python2.7/site-packages/scipy* $VIRTUAL_ENV/lib/python2.7/site-packages/ - Link lxml to the virtualenv
ln -s /usr/lib/python2.7/site-packages/lxml* $VIRTUAL_ENV/lib/python2.7/site-packages/ - Optional: link matplotlib to the virtualenv and install dependencies (only if you chose to install matplotlib)
pip install python-dateutil
pip install pyparsing
pip install six
ln -s /usr/lib/python2.7/site-packages/matplotlib $VIRTUAL_ENV/lib/python2.7/site-packages/
ln -s /usr/lib/python2.7/site-packages/pylab.py $VIRTUAL_ENV/lib/python2.7/site-packages/ - Install sPyNNaker
pip install sPyNNaker - Install pyNN-SpiNNaker
pip install pyNN-SpiNNaker - Optional Install sPyNNakerExternalDevicesPlugin (used for live input and output)
pip install sPyNNakerExternalDevicesPlugin - Optional Install sPyNNakerExtraModelsPlugin (provides some non-standard PyNN models)
pip install sPyNNakerExtraModelsPlugin
You can now configure your environment.
64-bit Fedora Virtualenv Installation
- Install virtualenv
sudo pip install virtualenv - Create a virtualenv;
<name>in the following can be replaced by the name of your choice
virtualenv <name> - Activate the virtualenv
source <name>/bin/activate - Link numpy to the virtualenv
ln -s /usr/lib64/python2.7/site-packages/numpy* $VIRTUAL_ENV/lib/python2.7/site-packages/ - Link scipy to the virtualenv
ln -s /usr/lib64/python2.7/site-packages/scipy* $VIRTUAL_ENV/lib/python2.7/site-packages/ - Link lxml to the virtualenv
ln -s /usr/lib64/python2.7/site-packages/lxml* $VIRTUAL_ENV/lib/python2.7/site-packages/ - Optional: link matplotlib to the virtualenv and install dependencies (only if you chose to install matplotlib)
pip install python-dateutil
pip install pyparsing
pip install six
ln -s /usr/lib64/python2.7/site-packages/matplotlib $VIRTUAL_ENV/lib/python2.7/site-packages/
ln -s /usr/lib64/python2.7/site-packages/pylab.py $VIRTUAL_ENV/lib/python2.7/site-packages/ - Install sPyNNaker
pip install sPyNNaker - Install pyNN-SpiNNaker
pip install pyNN-SpiNNaker - Optional Install sPyNNakerExternalDevicesPlugin (used for live input and output)
pip install sPyNNakerExternalDevicesPlugin - Optional Install sPyNNakerExtraModelsPlugin (provides some non-standard PyNN models)
pip install sPyNNakerExtraModelsPlugin
You can now configure your environment.
Mac OS X Virtualenv Installation
- Install virtualenv
sudo pip install virtualenv - Create a virtualenv;
<name>in the following can be replaced by the name of your choice
virtualenv <name> - Activate the virtualenv
source <name>/bin/activate - Link numpy to the virtualenv
ln -s /opt/local/Library/Frameworks/Python.framework/Versions/2.7/lib/python2.7/site-packages/numpy* $VIRTUAL_ENV/lib/python2.7/site-packages/ - Link scipy to the virtualenv
ln -s /opt/local/Library/Frameworks/Python.framework/Versions/2.7/lib/python2.7/site-packages/scipy* $VIRTUAL_ENV/lib/python2.7/site-packages/ - Link lxml to the virtualenv
ln -s /opt/local/Library/Frameworks/Python.framework/Versions/2.7/lib/python2.7/site-packages/lxml* $VIRTUAL_ENV/lib/python2.7/site-packages/ - Optional: link matplotlib to the virtualenv and install dependencies (only if you chose to install matplotlib)
pip install python-dateutil
pip install pyparsing
pip install six
ln -s /opt/local/Library/Frameworks/Python.framework/Versions/2.7/lib/python2.7/site-packages/matplotlib $VIRTUAL_ENV/lib/python2.7/site-packages/
ln -s /opt/local/Library/Frameworks/Python.framework/Versions/2.7/lib/python2.7/site-packages/pylab.py $VIRTUAL_ENV/lib/python2.7/site-packages/ - Install sPyNNaker
pip install sPyNNaker - Install pyNN-SpiNNaker
pip install pyNN-SpiNNaker - Optional Install sPyNNakerExternalDevicesPlugin (used for live input and output)
pip install sPyNNakerExternalDevicesPlugin - Optional Install sPyNNakerExtraModelsPlugin (provides some non-standard PyNN models)
pip install sPyNNakerExtraModelsPlugin
You can now configure your environment.
Windows Virtualenv Installation
- Open a console as administrator and cd to your home directory
cd %HOMEPATH% - Install virtualenv
pip install virtualenv - Create a virtualenv;
<name>in the following can be replaced by the name of your choice
virtualenv <name> - Activate the virtualenv
<name>\Scripts\activate.bat - Link numpy to the virtualenv
mklink /D %VIRTUAL_ENV%\Lib\site-packages\numpy C:\Python27\Lib\site-packages\numpy
mklink %VIRTUAL_ENV%\Lib\site-packages\numpy-1.9.1-py2.7.egg-info C:\Python27\site-packages\numpy-1.9.1-py2.7.egg-info - Link scipy to the virtualenv
mklink /D %VIRTUAL_ENV%\Lib\site-packages\scipy C:\Python27\Lib\site-packages\scipy
mklink %VIRTUAL_ENV%\Lib\site-packages\scipy-0.14.1rc1-py2.7.egg-info C:\Python27\site-packages\scipy-0.14.1rc1-py2.7.egg-info - Link lxml to the virtualenv
mklink /D %VIRTUAL_ENV%\Lib\site-packages\lxml C:\Python27\Lib\site-packages\lxml
mklink /D %VIRTUAL_ENV%\Lib\site-packages\lxml-3.4.1-py2.7.egg-info C:\Python27\site-packages\lxml-3.4.1-py2.7.egg-info - Optional: link matplotlib to the virtualenv and install dependencies (only if you chose to install matplotlib)
pip install python-dateutil
pip install pyparsing
pip install six
mklink /D %VIRTUAL_ENV%\Lib\site-packages\matplotlib C:\Python27\Lib\site-packages\matplotlib
mklink %VIRTUAL_ENV%\Lib\site-packages\pylab.py C:\Python27\Lib\site-packages\pylab.py - Optional: To make matplotlib work within a virtualenv, create the following environment variables:
TCL_LIBRARY: C:\Python27\tcl\tcl8.5
TK_LIBRARY: C:\Python27\tcl\tk8.5 - Install sPyNNaker
pip install sPyNNaker - Install pyNN-SpiNNaker
pip install pyNN-SpiNNaker - Optional Install sPyNNakerExternalDevicesPlugin (used for live input and output)
pip install sPyNNakerExternalDevicesPlugin - Optional Install sPyNNakerExtraModelsPlugin (provides some non-standard PyNN models)
pip install sPyNNakerExtraModelsPlugin
You can now configure your environment.
Configuration
When SpyNNaker is first called, if a configuration file is not found, it will create one in your home directory and exit. It is possible to ask SpyNNaker to do this before you run your first simulation as follows:
python -c "import pyNN.spiNNaker"
Note that if you have previously installed a version of the spiNNaker software, you may already have a file called “.pacman.cfg” in your home directory. In this case, SpyNNaker will attempt to use this file for its paramters. If you don’t have this file, a new file called “.spynnaker.cfg” will be created in your home directory. You must edit this file to ensure that SpyNNaker can access your SpiNNaker machine. Upon opening this file, the part to alter will look like the following:
[Machine]
machineName = None
version = None
Within the file, you should set machineName to the IP address or hostname of your SpiNNaker machine, and version to the version of your SpiNNaker board; this will almost certainly be “3” for a 4-chip board or “5” on a 48-chip board.
Running some examples
- Download the examples from here (zip) or here (tar.gz)
- Extract the archive
- Go to the “examples” folder
- Run:
python va_benchmark.py - You will see the system go through a series of processes from partitioning, to placement, to routing and finally to loading and running.
- Once the example has finished, you should see a graph, that will look something like this:
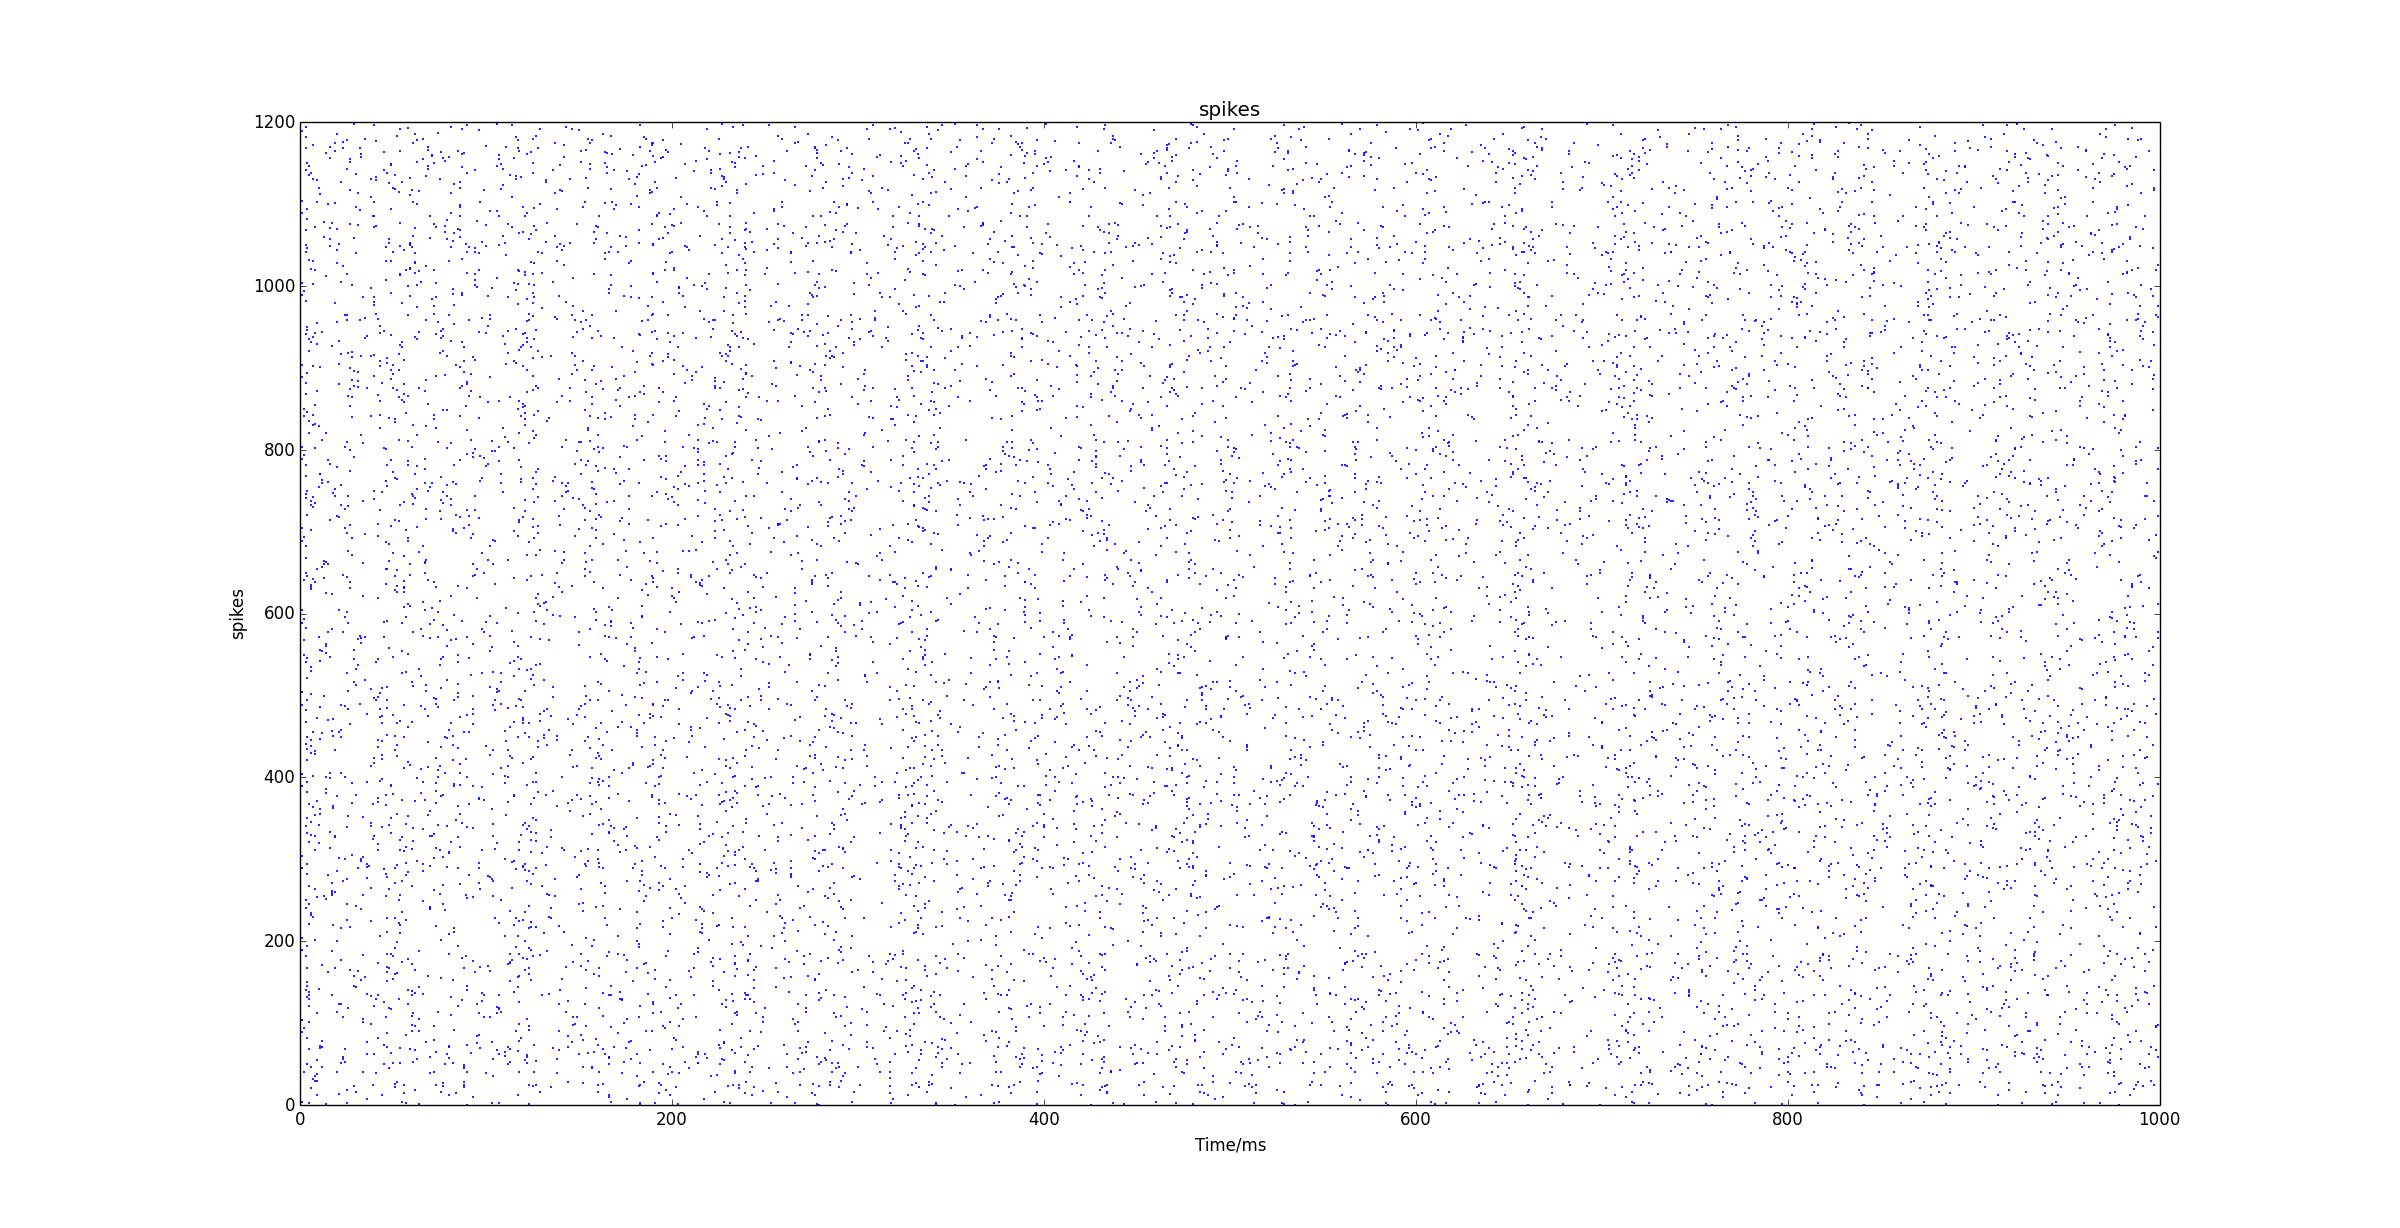 If you get the output above, you have successfully installed your system.
Troubleshooting
- If you experience the error:
**UnicodeDecodeError: 'ascii' codec can't decode byte 0xb0 in position 1: ordinal not in range(128)**
Then to solve it, edit C:\Python27\Lib\mimetypes.py and add these codes:
if sys.getdefaultencoding() != 'gbk':
    reload(sys)
    sys.setdefaultencoding('gbk')
before the following line:
default_encoding = sys.getdefaultencoding()