Installation
- Install Python requirements.
- Install the C development requirements.
- Java.
- Install an IDE — optional but recommended for ease of use.
- Clone the git repositories.
- Install the python software in developer mode.
- Set up the C environment variables.
- Build the C code.
- Set up the PyNN links.
- Configure the environment.
- Run some examples.
- Multiple PyNN versions
- Moving away from sPynnaker8.
Python Requirements
- Install the general platform requirements
- If you would prefer to use a virtualenv, follow these instructions to set up the dependencies.
-
Install other general dependencies via pip:
pip install "appdirs>=1.4.2,<2.0.0" future "numpy>=1.12,<1.9999"  "scipy>=0.16.0" "six>=1.8.0" "pylru>=1" enum34 future lxml jsonschema sortedcollections

pip install  "rig>=2.0.0,<3.0.0" futures enum-compat pytz tzlocal "requests>=2.4.1" matplotlib

pip install  csa "quantities>=0.12.1" "pynn>=0.9.2,<0.10" "lazyarray>=0.2.9,<=0.4.0" "neo>=0.5.2,< 0.7.0"
You may need to install python3-tk.
We recommend the use of virtualenv for development work.
The remainder of these installation instructions assume that the command “python” corresponds to the Python version you have installed here (recommended 3.6 or later); please ensure that this is the case.
C Development Requirements
Install a C compiler that is compatible with SpiNNaker and dependencies.
Git Cloning
The repositories to be cloned are shown below.
We recommend that all repositories are cloned into the same parent directory as some of our scripts and tool defaults assume this.
If you are using an IDE, it is recommended that all modules are cloned so that any changes made are automatically reflected across the entirety of the software.
| Name | URL | Code Type |
|---|---|---|
spinnaker_tools |
https://github.com/SpiNNakerManchester/spinnaker_tools.git | C |
spinn_common |
https://github.com/SpiNNakerManchester/spinn_common.git | C |
SpiNNUtils |
https://github.com/SpiNNakerManchester/SpiNNUtils.git | Python |
SpiNNMachine |
https://github.com/SpiNNakerManchester/SpiNNMachine.git | Python |
SpiNNStorageHandlers |
https://github.com/SpiNNakerManchester/SpiNNStorageHandlers.git | Python |
spalloc |
https://github.com/SpiNNakerManchester/spalloc.git | Python |
spalloc_server |
https://github.com/SpiNNakerManchester/spalloc_server.git | Python |
PACMAN |
https://github.com/SpiNNakerManchester/PACMAN.git | Python |
SpiNNMan |
https://github.com/SpiNNakerManchester/SpiNNMan.git | Python |
DataSpecification |
https://github.com/SpiNNakerManchester/DataSpecification.git | Python |
SpiNNFrontEndCommon |
https://github.com/SpiNNakerManchester/SpiNNFrontEndCommon.git | Python and C |
SpiNNakerGraphFrontEnd |
https://github.com/SpiNNakerManchester/SpiNNakerGraphFrontEnd.git | Python and C |
sPyNNaker |
https://github.com/SpiNNakerManchester/sPyNNaker.git | Python and C |
sPyNNaker8NewModelTemplate |
https://github.com/SpiNNakerManchester/sPyNNaker8NewModelTemplate.git | Python and C |
PyNN8Examples |
https://github.com/SpiNNakerManchester/PyNN8Examples.git | Python |
sPyNNakerVisualisers |
https://github.com/SpiNNakerManchester/sPyNNakerVisualisers.git | Python |
IntroLab |
https://github.com/SpiNNakerManchester/IntroLab.git | Python |
JavaSpiNNaker |
https://github.com/SpiNNakerManchester/JavaSpiNNaker.git | Optional Java |
SupportScripts |
https://github.com/SpiNNakerManchester/SupportScripts.git | Python and scripting |
The last of these repositories contains a useful selection of scripts for semi-automatically building the toolchain.
Java Development kit
A Java JDK will be required in the following conditions
- If modifying or even just using the Java versions of the tools
- If modifying the Remote Access software for the Human Brain Project portal
A Java JRE will be required
- If you are going to use an IDE (which requires Java and does not have one with it)
We recommend the Oracle Java
The tools require at least Java 8 but there is no known reason that a more up to date version cannot be used. We have regularly tested OpenJDK 8 and OpenJDK 11 with no problems.
Java version of the tools
Java version is optional and off by default.
Requires the JavaSpiNNaker repository.
Current Dec 2018 situation
The Java version is still under development and requires you to use the extractor2 branch
- DataSpecification
- PACMAN
- SpiNNFrontEndCommon
- sPyNNaker
- SpiNNakerGraphFrontEnd
- JavaSpiNNaker
You will be required to build the jar file required.
Open JavaSpiNNaker in an IDE which supports maven.
Build “SpiNNaker Java Host” with dependencies. This will create the SpiNNaker-comms-0.0.1-SNAPSHOT.jar file in SpiNNaker-comms/target
It is also possible to install maven and run “mvn package” on the command line from the JavaSpiNNaker directory.
See Configure the environment for how to active these.
Integrated Development Environment
Although optional, we highly recommend the use of an Integrated Development Environment (IDE). The code-base is large and complex and an IDE helps to simplify the development process. Within the team at Manchester, we use two IDEs with different benefits and issues. The installation of these is detailed below.
-
PyCharm — Version 4.5.3 has been tested but other versions should also work. This is very good for Python development and supports C development as well to some degree. Java development is not supported in this client. PyCharm is good at working out the links between Python code.
-
Eclipse — Eclipse Oxygen has been thoroughly tested, but other versions should also work. So far, we have been downloading the “Eclipse IDE for Java Developers” as the starting point, and then adding the packages as detailed below. Eclipse supports development in multiple languages through the addition of plugins. Several plugins exist for doing a wide variety of development tasks, including Python, C and Java; Eclipse is the way to go if you are planning on developing in Java. However, Eclipse is known to require quite a lot of memory (around 1GB just for eclipse). Plugins required are:
- PyDev — This is required for Python Development. This can be installed from the Eclipse Marketplace (Help → Eclipse MarketPlace…) by searching for
pydev. - CDT — This is required for C Development. This has to be installed from the Help → Install New Software… menu option. Here, paste in this URL: CDT —
http://download.eclipse.org/tools/cdt/releases/9.0. You can then select to install “C/C++ Development Tools” as well as “C/C++ GCC Cross Compiler Support”, “C/C++ Autotools Support” and “C/C++ GDB Hardware Debugging”. - AnyEditTools — This optional plugin enables useful features like converting tabs to spaces and removing trailing spaces on save. This can be installed from the Eclipse Marketplace (Help → Eclipse MarketPlace…) by searching for
AnyEditTools.
- PyDev — This is required for Python Development. This can be installed from the Eclipse Marketplace (Help → Eclipse MarketPlace…) by searching for
Command line
To clone using git on the command line, run:
git clone <url>
where <url> is one of the URLs from above. It is strongly recommended that all modules be installed into the same directory.
PyCharm
For each repository:
- Go to VCS → Checkout from Version Control → github
- In “Git Repository URL” enter the repository URL.
- Click Clone.
Dependencies
You will also need to set up the dependencies between projects.
This is done as follows:
- Go to File → Settings → Project:
- Select Project Dependencies
- Select the module and then tick the appropriate dependencies
Eclipse
For each repository:
- Go to File → Import → Git → Projects from Git → Clone URI
- In “URI” enter the repository URI.
- Click Finish
- Once the repository is imported:
- If the project is a Python project, right click and select “PyDev” → “Set as PyDev Project”.
- If the project is a C project:
- Select “File” → “New” → “Other…”
- Select “C/C++” → “Convert to a C/C++ Project (Adds C Nature)” and click on “Next”
- Select the project from the list.
- Select the “C Project” radio button.
- Select “Executable” and the “Cross GCC” from the list.
- Click on “Finish”.
- If the project is a Python and C project:
- Right click and select “PyDev” → “Set as PyDev Project”.
- Select “File” → “New” → “Other…”
- Select “C/C++” → “C Project” and click on “Next”.
- Enter the name of the project followed by
_c_code. - Uncheck “use default location”, click on “Browse” and find the subfolder of the project containing the C code (e.g. sPyNNaker has a neural_modelling subfolder).
- Select “Exectuable” → “Empty Project” and “Cross GCC” and click on “Next”.
- Select “Next” again.
- Set the “Cross Compiler Prefix” to
arm-none-eabi- - Set the path of the compiler to wherever you installed it (on Windows using MinGW/MSYS installed to the
C:\folder, this isC:\Program Files (x86)\GNU Tools ARM Embedded\4.8 2013q4\bin). - Click on “Finish”.
Dependencies
You will also need to set up the dependencies between projects.
In each Python project, this is done as follows:
- Right-click on the project
- Select “Properties”
- Select “Project References”.
- Tick the appropriate dependencies for each module.
In a C project, this is done as follows:
- Right-click on the project
- Select “Properties”
- Select “C/C++ Build” → “Settings”
- In the “Tools Settings” tab, select “Cross GCC Compiler” → “Includes”
- Click on the “Add” icon.
- Add the dependency as
${workspace_loc:<dependency_path>}where<dependency_path>is the appropriate dependency. - Repeat for all the dependencies.
Python Dependencies
| Module | Dependencies |
|---|---|
| SpiNNMachine | SpiNNUtils |
| SpiNNStorageHandlers | SpiNNUtils |
| SpiNNMan | SpiNNUtils, SpiNNMachine, SpiNNStorageHandlers |
| PACMAN | SpiNNUtils, SpiNNMachine |
| DataSpecification | SpiNNUtils, SpiNNMachine, SpiNNStorageHandlers |
| SpiNNFrontEndCommon | SpiNNUtils, SpiNNMachine, SpiNNStorageHandlers, SpiNNMan, PACMAN, DataSpecification, spalloc |
| SpiNNakerGraphFrontEnd | SpiNNUtils, SpiNNMachine, SpiNNStorageHandlers, SpiNNMan, PACMAN, DataSpecification, SpiNNFrontEndCommon, spalloc |
| sPyNNaker | SpiNNUtils, SpiNNMachine, SpiNNStorageHandlers, SpiNNMan, PACMAN, DataSpecification, SpiNNFrontEndCommon, spalloc |
| sPyNNaker8NewModelTemplate | SpiNNUtils, SpiNNMachine, SpiNNStorageHandlers, SpiNNMan, PACMAN, DataSpecification, SpiNNFrontEndCommon, sPyNNaker, sPyNNaker8, spalloc |
| PyNN8Examples | SpiNNUtils, SpiNNMachine, SpiNNStorageHandlers, SpiNNMan, PACMAN, DataSpecification, SpiNNFrontEndCommon, sPyNNaker, sPyNNaker8, spalloc |
| sPyNNakerVisualisers | SpiNNUtils, SpiNNMachine, SpiNNStorageHandlers, SpiNNMan, PACMAN, DataSpecification, SpiNNFrontEndCommon, spalloc |
| IntroLab | SpiNNUtils, SpiNNMachine, SpiNNStorageHandlers, SpiNNMan, PACMAN, DataSpecification, SpiNNFrontEndCommon, SpiNNakerGraphFrontEnd, sPyNNaker, sPyNNaker8, spalloc |
C Dependencies
Note that include files are generally installed into spinnaker_tools/include, thus even when a C module is dependent on another library, you only need to add this location. The C code in sPyNNaker is an exception as some of the headers are dynamically included during the build, and so it is not possible to provide a pre-built library for sPyNNaker neural modelling.
| Module Folder | Include Dependencies |
|---|---|
spinn_common |
spinnaker_tools/include |
SpiNNFrontEndCommon/c_common |
spinnaker_tools/include |
SpiNNakerGraphFrontEnd/spinnaker_graph_front_end/examples |
spinnaker_tools/include |
sPyNNaker/neural_modelling |
spinnaker_tools/include |
sPyNNaker8NewModelTemplate/c_models |
spinnaker_tools/include, sPyNNaker/neural_modelling/src |
Installing Python Modules
Installing the Python modules in developer mode allows you to use the modules from the command line. Note that the IDEs allow you to run code directly within the IDE, and so this step is optional if you have installed an IDE. Even when using an IDE, it can be useful to install the modules to avoid issues with the install.
For each of the python modules, go into the root directory of the module and run:
[sudo] python setup.py develop --no-deps [--user]
Where sudo is required if you are on Linux or OS X and would like to install the dependencies as root (on windows you would need to open a console as Administrator); and --user is required if you would like to install the modules under your user. Neither are required if you are using a virtualenv. If you have installed Python 3 then make sure that the version of “python” is the correct one before continuing.
This step can be performed for every Python repository you have — assuming you have put them all into the same location — by using the setup.sh or setup_sudo.sh scripts in the SupportScripts repository.
Set up the C environment variables
- Create an environment variable
SPINN_DIRSthat points at the location of the cloned spinnaker_tools folder (note that in Windows, this should be the MinGW Posix path e.g. if you have extracted the archive toC:\SpiNNaker-Tools\, you should set the environment variable to/c/SpiNNaker-Tools). - Add the
spinnaker_tools/toolsfolder to yourPATHenvironment variable. This does not need to be a POSIX path on Windows e.g.C:\spinnaker_tools\toolsis fine on Windows, or/spinnaker_tools/toolson Linux or Mac. - Add the
spinnaker_tools/toolsfolder to yourPERL5LIBenvironment variable (or create this environment variable if it is not already set; note that in Windows, this should be the MinGW Posix path e.g. if you have extracted the archive toC:\spinnaker_tools\, you should set the environment variable to/c/spinnaker_tools/tools). - Create a new environment variable
NEURAL_MODELLING_DIRSwhich is set to the path of theneural_modellingsubfolder of the extracted archive (note that in Windows, this should be the MinGW Posix path e.g. if you have extracted the archive toC:\sPyNNaker\, you should set the environment variable to/c/sPyNNaker/neural_modelling).
Build the C Code
The C code to compile is (in order) as follows:
| Module | Sub Folder | Commands | Clean Command |
|---|---|---|---|
spinnaker_tools |
make |
make clean |
|
spinn_common |
makemake install |
make clean |
|
SpiNNFrontEndCommon |
c_common |
makemake install |
make clean |
sPyNNaker |
neural_modelling |
make |
make clean |
SpiNNakerGraphFrontEnd |
spinnaker_graph_front_end/examples |
make |
make clean |
A script is also available here, or in the SupportScripts repository called automatic_make.sh which performs the appropriate steps for you. Note that it will clean and build everything every time it is run; this may take some time depending on your machine. Note also that this assumes that you have checked out the git code into a single location, and that you have installed and setup the Python modules already (as described in the previous step). If you haven’t done so then this step is likely to fail.
If you have also downloaded the repositories for building new neuron models, then the C code is compiled using the following commands:
| Module | Sub Folder | Commands | Clean Command |
sPyNNaker8NewModelTemplate |
c_models |
make |
make clean |
This compilation is included in the automatic make script.
Configuration
Run spynnaker.pyNN.setup_pynn.py
When SpyNNaker is first called, if a configuration file is not found, it will create one in your home directory and exit. It is possible to ask SpyNNaker to do this before you run your first simulation as follows:
python -c "import pyNN.spiNNaker"
If you do not already have one, a new file called “.spynnaker.cfg” will be created in your home directory. You must edit this file to ensure that SpyNNaker can access your SpiNNaker machine. Upon opening this file, the part to alter will look like the following:
[Machine]
machineName = None
version = None
Also, make sure you turn on extraction of iobuf when working with the C code at all. Without this, you will be unable to read anything that your code writes to the logs.
[Reports]
extract_iobuf = True
There are plenty of other configuration options that you may wish to edit too; please look at the default configuration files in spynnaker/pyNN/spynnaker.cfg, spinn_front_end_common/interface/spinnaker.cfg and spinnaker_graph_front_end/spiNNakerGraphFrontEnd.cfg for more information.
[Note: if you are running using SpiNNakerGraphFrontEnd then the file in your home directory you need to edit will be called “.spiNNakerGraphFrontEnd.cfg”.]
If you have a SpiNNaker board, then go to Local Board. If you do not have a SpiNNaker board, please follow the instructions in Instructions on how to use the different front ends in virtual mode and then go to Running some examples.
Local Board
Within the file, you should set machineName to the IP address or hostname of your SpiNNaker machine, and version to the version of your SpiNNaker board; this will almost certainly be “3” for a 4-chip board or “5” on a 48-chip board.
The default IP address for a spinn-3 board is 192.168.240.253 and the default IP address for a spinn-5 board is 192.168.240.1.
TODO: Does there need to be anything in here about using spalloc_server=spinnaker.cs.man.ac.uk and spalloc_user, with machineName and version set to None?
Now go to Network Configuration.
Network Configuration
Go to the network settings for your computer and add or set an IPv4 entry with the following address for the adapter connected to the SpiNNaker board:
1. ip address = 192.168.240.254
2. sub-mask = 255.255.255.0
3. default gateway = 0.0.0.0
Java Tools
Optional but requires the steps in the Java Section.
Java is off by default so requires changing the values in the Java section of the config file. Copy and change the ones required from spinn_front_end_common\interface\spinnaker.cfg
Running some examples
- Go to the “examples” folder in Pynn8Examples
- Run:
va_benchmark.py - You will see the system go through a series of processes from partitioning, to placement, to routing and finally to loading and running.
-
Once the example has finished, you should see a graph that will look something like this:
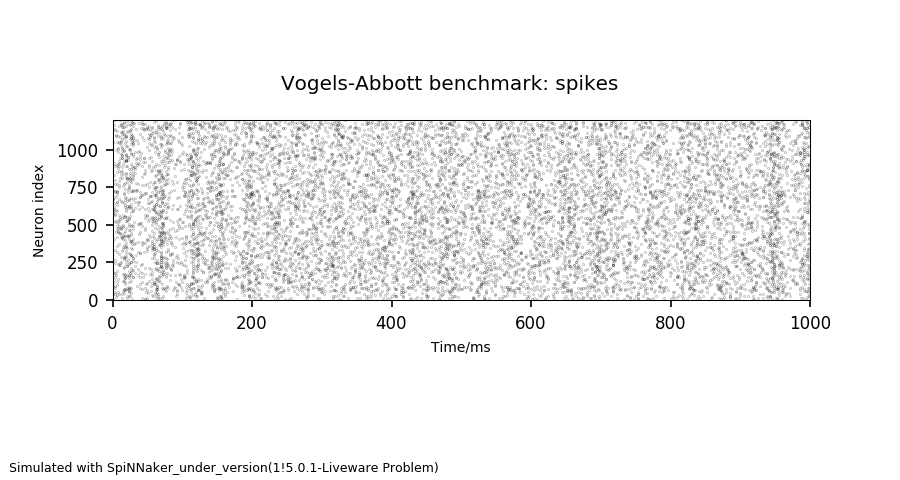
If you get the output above, you have successfully installed your system.
Moving away from sPynnaker8
This section only applies if you have previous used sPyNNaker while we where using the sPyNNaker8 repository.
All sPynnaker8 code has been merged into sPynnaker.
- Run spynnaker.pyNN.setup_pynn.py
-
Replace any import of just spynnaker8 to spynnaker import spynnaker8 as …. becomes import spynnaker as …
- Replace all other spynnaker8 imports with spynnaker.pyNN import spynnaker8.XYZ … becomes import spynnaker.pyNN.XYZ ….
All The integration tests have been moved from sPyNNaker8/p8_integration_tests to sPyNNaker/spynnaker_integration_tests
Note: In the near future the PyNN8Examples and sPyNNaker8NewModelTemplate repositories and directories will be renamed to remove the 8.