The version described here is no longer supported.
This guide details how to install the release version of the tools required to run simulations on SpiNNaker using the PyNN scripting language.
Installation
You must first install the Python Dependencies. Continue to the Standard Central Installation, User-only Installation or Virtualenv Installation to install the remaining requirements, depending on the needs of your working environment.
Note: sPyNNakerExternalDevicesPlugin and sPyNNakerExtraModelsPlugin are no longer required. These extra modules have been merged in to the main sPyNNaker module. You will be asked to uninstall these modules below if you have previously installed them, but will note that there are no instructions for installing a newer version.
- Python Dependencies
- Standard Central Installation
- User-Only Installation
- Virtualenv Installation
- Configuration
- Running some examples
- Troubleshooting
Standard Central Installation
These instructions will install the required packages in a central location. If you are installing on Linux, you must have root access to do this (or prepend each command with sudo), and Windows users should run these commands from a command prompt run as Administrator (right-click the shortcut for the command prompt and select “Run as administrator”, but do not use the sudo in the commands below).
If you already have installed sPyNNaker previously (and the optional sPyNNakerExternalDevicesPlugin and/or sPyNNakerExtraModelsPlugin), you will need to uninstall it:
[sudo] pip uninstall pyNN-SpiNNaker
[sudo] pip uninstall sPyNNaker
[sudo] pip uninstall sPyNNakerExternalDevicesPlugin
[sudo] pip uninstall sPyNNakerExtraModelsPlugin
For PyNN 0.9 support:
-
Install sPyNNaker8:
[sudo] pip install 'sPyNNaker8=1!4.0.0' -
Install pyNN-SpiNNaker:
[sudo] python -m spynnaker8.setup-pynn -
Install Matplotlib:
[sudo] pip install matplotlib
If for some reason you have to use a version of PyNN earlier than 0.8 then please contact us.
You can now configure your environment.
User-only Installation
These instructions will install the required packages only for the current user (in your home directory). This can avoid issues where you don’t have root access to the machine you are installing on, or on a shared machine where the dependencies might otherwise conflict with those of other users.
If you already have installed sPyNNaker previously (and the optional sPyNNakerExternalDevicesPlugin and/or sPyNNakerExtraModelsPlugin), you will need to uninstall it:
pip uninstall pyNN-SpiNNaker
pip uninstall sPyNNaker
pip uninstall sPyNNakerExternalDevicesPlugin
pip uninstall sPyNNakerExtraModelsPlugin
For PyNN 0.9 support:
-
Install sPyNNaker8:
pip install 'sPyNNaker8=1!4.0.0' --user -
Install pyNN-SpiNNaker:
python -m spynnaker8.setup-pynn -
Install Matplotlib:
pip install matplotlib --user
If for some reason you have to use a version of PyNN earlier than 0.8 then please contact us.
You can now configure your environment.
Virtualenv Installation
Follow these instructions to install the dependencies in a virtual environment.
If you already have installed sPyNNaker previously (and the optional sPyNNakerExternalDevicesPlugin and/or sPyNNakerExtraModelsPlugin), you will need to uninstall it:
-
Activate your virtualenv,
<name>source <name>/bin/activate -
Uninstall the existing tools
pip uninstall pyNN-SpiNNaker
pip uninstall sPyNNaker
pip uninstall sPyNNakerExternalDevicesPlugin
pip uninstall sPyNNakerExtraModelsPlugin
To install the tools, first, activate your virtualenv, <name>:
source <name>/bin/activate
Windows 64-bit:
-
Install numpy:
pip install https://github.com/SpiNNakerManchester/SpiNNakerManchester.github.io/releases/download/v1.0-win64/numpy-1.13.1.mkl-cp27-cp27m-win_amd64.whl -
Install scipy:
pip install https://github.com/SpiNNakerManchester/SpiNNakerManchester.github.io/releases/download/v1.0-win64/scipy-0.19.1-cp27-cp27m-win_amd64.whl```
Windows 32-bit:
-
Install numpy (optional if you are going to use a Virtual Env):
pip install https://github.com/SpiNNakerManchester/SpiNNakerManchester.github.io/releases/download/v1.0-win32/numpy-1.13.1.mkl-cp27-cp27m-win32.whl``` -
Install scipy (optional if you are going to use a Virtual Env):
pip install https://github.com/SpiNNakerManchester/SpiNNakerManchester.github.io/releases/download/v1.0-win32/scipy-0.19.1-cp27-cp27m-win32.whl```
For PyNN 0.9 support:
-
Install sPyNNaker8:
pip install sPyNNaker8 -
Install pyNN-SpiNNaker:
python -m spynnaker8.setup-pynn -
Install Matplotlib:
pip install matplotlib
If for some reason you have to use a version of PyNN earlier than 0.8 then please contact us.
You can now configure your environment.
Configuration
When SpyNNaker is first called, if a configuration file is not found, it will create one in your home directory and exit. It is possible to ask SpyNNaker to do this before you run your first simulation as follows:
Run this small script
import pyNN.spiNNaker as sim
sim.setup()
sim.end()
Unless one already exists a new file called “.spynnaker.cfg” will be created in your home directory. You must edit this file to ensure that SpyNNaker can access your SpiNNaker machine. Upon opening this file, the part to alter will look like the following:
[Machine]
machineName = None
version = None
If you have a SpiNNaker board, then go to Local Board if you do not have a SpiNNaker board, please follow the instructions in Instructions on how to use the different front ends in virtual mode and then go to Running some examples.
Local Board
Within the file, you should set machineName to the IP address or hostname of your SpiNNaker machine, and version to the version of your SpiNNaker board; this will almost certainly be “3” for a 4-chip board or “5” on a 48-chip board. The default ip address for a spinn-3 board is 192.168.240.253 and the default ip address for a spinn-5 board is 192.168.240.1.
Now go to Network Configuration.
Network Configuration
Go to the network settings for your computer and add or set an IPv4 entry with the following address for the adapter connected to the SpiNNaker board:
- IP address =
192.168.240.254 - sub-mask =
255.255.255.0 - default gateway =
0.0.0.0
Running some examples
-
Download the examples:
- Extract the archive
- Go to the “examples” folder
-
Run:
python va_benchmark.py - You will see the system go through a series of processes from partitioning, to placement, to routing and finally to loading and running.
-
Once the example has finished, you should see a graph that will look something like this (for PyNN 0.9):
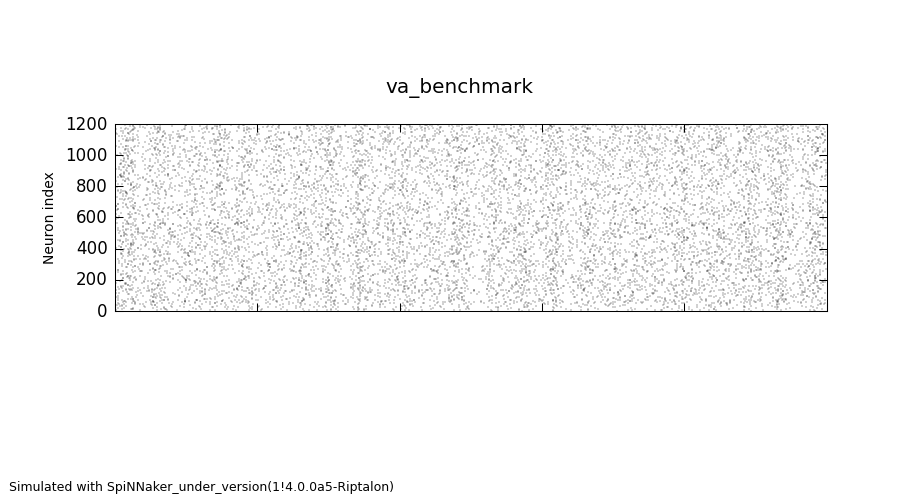
If you get the output above, you have successfully installed your system.
Troubleshooting
-
If on Windows you experience the error:
**UnicodeDecodeError: 'ascii' codec can't decode byte 0xb0 in position 1: ordinal not in range(128)**Then to solve it, edit
C:\Python27\Lib\mimetypes.pyand add these codes:if sys.getdefaultencoding() != 'gbk': reload(sys) sys.setdefaultencoding('gbk')before the following line:
default_encoding = sys.getdefaultencoding() -
In OSX, if experiencing the following tkinter error:
_tkinter.TclError: no display name and no $DISPLAY environment variableit may be solved by setting the backend for matplotlib. This can be done by editing the matplotlibrc file in the current working directory to read to
backend: TkAgg. This is usually found in$DEV/lib/python2.7/site-packages/matplotlib/mpl-data/matplotlibrcIn a virtualenv, create a new file in the root directory
.matplotlib/matplotlibrcthat readsbackend: TkAgg. (Sample matplotlibrc file)If you are still having issues, you may also need to install XQuartz.